
Chicken Katsu—Japanese-style breaded chicken breast cutlets—is comfort food that still warms me just as it did the first chilly afternoon I tried it in a small restaurant in Tokyo.

It was a damp winter day, and we were tired and hungry (ever feel that way after work?).
We followed our noses to a tucked-away basement restaurant, grabbed our picture menus, and pointed at what looked like the ideal meal for the moment: juicy chicken breaded, fried, and served with a sweet, sticky Asian sauce called tonkatsu.
It was simple, satiating, and exactly what the moment needed.
Years later, it still hits the spot!

About Chicken Katsu
- Chicken katsu (or pork katsu, if pork cutlets are used instead of chicken breast) is ubiquitous throughout Japan (just like Japanese Curry).
- It is similar to our other cultures’ versions of crispy chicken, such as southern Baked Fried Chicken, popular European dishes like schnitzel, and American-Italian Baked Chicken Parmesan.
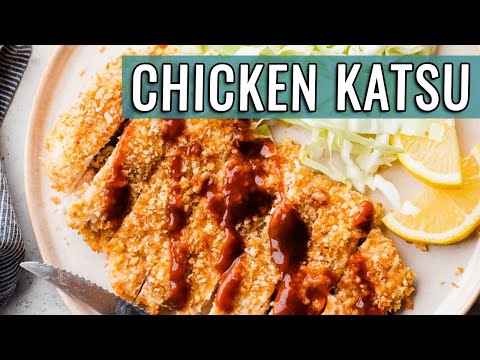
What sets chicken katsu apart is how it’s pounded thinly, coated in panko breadcrumbs (which makes it extra crunchy), and served with shredded cabbage, rice, lemon wedges, and tonkatsu sauce.

Chicken Katsu Sauce
Chicken katsu is typically served with tonkatsu sauce.
This sweet and tangy Japanese condiment is made of fruits and vegetables, such as tomatoes, celery, onions, dates, and prunes, along with soy sauce and more than 10 spices. It’s complex!
Here in the U.S., you can purchase it from many grocery stores or your local Asian market. I’ve also included a shortcut chicken katsu sauce recipe below that I adapted from Just One Cookbook.
How to Make Chicken Katsu
If your family loves crispy breaded chicken (me too!), then you’ll adore chicken katsu (and Crispy Asian Chicken Tenders).
Today’s recipe is a baked chicken katsu, made accessible for the average American cook.
- Rather than deep fry, I bake the chicken at a high temperature to make the outside crispy and keep the inside juicy.
- To mimic the indulgence of fried, prior to breading the chicken, I toast the breadcrumbs in a little bit of butter to create a yummy, crispy chicken without the fuss of a deep fryer.
Serve your katsu the traditional Japanese way (with shredded cabbage, rice, lemon, and tonkatsu sauce), or do a cultural mash-up and opt for your family’s favorite dipping sauces, like Barbecue Sauce, Greek Yogurt Ranch Dip, or the honey mustard dipping sauce from my Honey Mustard Chicken Tenders.
The Ingredients
- Chicken. Pounding the chicken cutlets until they’re nice and thin helps make them more tender. Plus, they cook in a flash! You can purchase chicken that is already sliced into cutlets, or cut your own from regular chicken breast. (I also suggest cutlets for this Chicken Francaise recipe.)
- Butter. Toasting the panko in butter adds rich, mouth-watering flavor to the breadcrumb coating without the need for a deep fryer.
- Panko. Creates the perfect crispy, crunchy coating (like on Air Fryer Chicken Tenders).
- Flour + Egg. Helps the egg and breadcrumbs adhere to the outside for maximum crispiness.
The Directions

- Pound the chicken cutlets and season with salt and pepper.

- Toast the breadcrumbs in a pan with butter. Add the flour to a separate bowl. In another bowl, beat the egg.

- Lightly dredge each chicken cutlet in the flour.

- Then, dip it into the egg mixture.

- Finally, dip it into the breadcrumbs.

- Lay the cutlets on baking trays topped with an oven-safe rack, then coat each one with nonstick spray.

- Bake chicken katsu at 425 degrees F for 12 to 14 minutes (or until it registers an internal temperature of 160 degrees F on an instant-read thermometer). Remove and let rest for 5 minutes. Serve with tonkatsu sauce and desired sides. I often top with green onion too. ENJOY!

Air Fryer Chicken Katsu
Here’s how to make chicken katsu in the air fryer (fans of my Air Fryer Fried Chicken Breast will love this!):
- Follow the recipe as directed through Step 6.
- Coat an air fryer basket with nonstick spray. Cook the chicken cutlets in a single layer (you may need to do a few batches) at 390 degrees F for 4 minutes.
- Flip the chicken over, then cook for another 2 to 5 minutes or until it is cooked through. Repeat with any remaining chicken.
Storage Tips
- To Store. Refrigerate leftover breaded chicken in an airtight container for up to 2 days.
- To Reheat. Rewarm leftovers on a baking sheet in the oven at 350 degrees F or in the microwave.
- To Freeze. Freeze chicken in an airtight, freezer-safe storage container for up to 3 months. Let thaw overnight in the refrigerator before reheating.
Meal Prep Tip
Up to 1 day in advance, pound the chicken. Refrigerate it in an airtight storage container until you’re ready to finish the recipe.
Leftover Ideas
Dice your leftover chicken katsu and add it to a serving of Homemade Fried Rice or Lemon Rice for a lemon chicken katsu spin. I’ve also reheated leftover chicken and served it on buns with cabbage and tonkatsu sauce for fantastic chicken katsu sandwiches.
What to Serve with Chicken Katsu


Recommended Tools to Make this Recipe
- Baking Sheet. My go-to for everything from roasted veggies to chicken katsu.
- Pie Dish. Perfect for the flour, egg, and breadcrumb mixtures.
- Meat Tenderizer. Great for pounding the chicken.

Multi-Purpose Pie Plate
Whether you’re making a delicious pie (even Chicken Pot Pie) or breading chicken for a recipe like this one, this pie plate is up for the job. It’s dishwasher-safe for easy cleanup!

Every bite of this chicken katsu takes me back to that cozy restaurant in Tokyo.
I hope it brings a little warmth and nourishment to your family too!
Frequently Asked Questions
No. Chicken katsu is not gluten free. However, you could experiment with swapping the flour and panko bread crumbs in this recipe for your favorite gluten free alternatives. If you give it a try, I’d love to hear your results.
To make dairy-free chicken katsu, swap the butter for canola oil, a similar vegetable oil, or olive oil.
Sure! Feel free to experiment with using thighs if you prefer dark meat. Take note that the cooking time will be different since thighs cook differently than breasts. Use 4 large chicken thighs for this recipe and remove any excess fat or gristle.
Chicken Katsu Video
If you enjoy this video, please subscribe to our YouTube channel. Be sure to click the BELL icon so you can be the first to know when we post a new video (and thank you for subscribing!).

Chicken Katsu
Ingredients
For the Chicken Katsu:
- 4 chicken breast cutlets*
- 3/4 teaspoon kosher salt divided
- 1/4 teaspoon ground black pepper
- 2 tablespoons unsalted butter**
- 1 cup panko breadcrumbs
- 1/4 cup white whole wheat flour or all-purpose flour
- 1 large egg
- Nonstick cooking spray recommended: olive oil spray
For Serving:
- Tonkatsu sauce***
- Finely shredded cabbage
- Lemon wedges
- Cooked rice white is traditional; use brown rice for a nutritional boost or cauliflower rice
Instructions
- Position an oven rack in the upper third of the oven and preheat the oven to 425 degrees F.
- Line a rimmed baking sheet with parchment paper. Place an oven-safe rack on top and coat generously with nonstick spray and set aside.
- Lightly pound the chicken cutlets into an even 1/2-inch thickness. Sprinkle the chicken cutlets with 1/2 teaspoon kosher salt and black pepper.

- In a medium skillet, melt the butter over medium heat. Add the breadcrumbs and remaining 1/4 teaspoon salt. Stir to coat the breadcrumbs with the melted butter. Let cook, stirring constantly, until the breadcrumbs are lightly toasted and turning golden brown, about 2 minutes. Transfer to a wide, shallow bowl or dish (a pie plate works well).
- In a separate shallow bowl, place the white whole wheat flour. In a third shallow bowl, beat the egg.
- Set up your workstation: chicken, flour, egg, panko, baking sheet. Working one at a time, dip each chicken cutlet lightly in flour to coat on all sides. Shake off the excess.
- Then, dip the chicken in the egg.
- Finally, dip the chicken into the panko. Pat the panko as needed so that it adheres. Arrange on the baking sheet so the cutlets are not touching. Mist the tops with nonstick spray.
- Bake the chicken katsu in the upper third of the oven, until the chicken is cooked through (it should reach an internal temperature of 165 degrees F; I pull mine out several degrees early and let the carryover cooking finish the rest), about 12 to 14 minutes.
- Remove from the oven and let rest 5 minutes.
- To serve, cut the chicken katsu into thin slices (if desired). Drizzle with the tonkatsu sauce. Serve with cabbage, a small bowl of rice, and lemon wedges, with the extra tonkatsu sauce in a bowl alongside.


Video
Notes
- *Chicken breast cutlets are chicken breasts that have been split in half horizontally to create two thinner pieces of chicken. You can buy them already cut or carefully cut your own. Or, you can pound very small chicken breasts to a 1/2-inch.
- **Traditional chicken katsu is deep-fried in vegetable or peanut oil; to mimic that indulgent spin, I toast the panko breadcrumbs in melted butter; if you prefer, you can toast them in canola oil or olive oil.
- ***Tonkatsu sauce is available at many supermarkets or at your local Asian grocery store. Or, you can make your quick version by combining 2 1/2 tablespoons ketchup, 2 tablespoons Worcestershire sauce, and 1 tablespoon oyster sauce. Add a pinch or two of sugar to taste (sauce adapted from Just One Cookbook).
- TO STORE: Refrigerate chicken in an airtight storage container for up to 2 days.
- TO REHEAT: Rewarm leftovers on a baking sheet in the oven at 350 degrees F or in the microwave.
- TO FREEZE: Freeze chicken in an airtight, freezer-safe storage container for up to 3 months. Let thaw overnight in the refrigerator before reheating.
Nutrition
Join today and start saving your favorite recipes
Create an account to easily save your favorite recipes and access FREE meal plans.
Sign Me Up


Wow, so good! Toasting the panko was a game-changer.
Hi Natalie! So glad you enjoyed the recipe! Thank you for this kind review!